
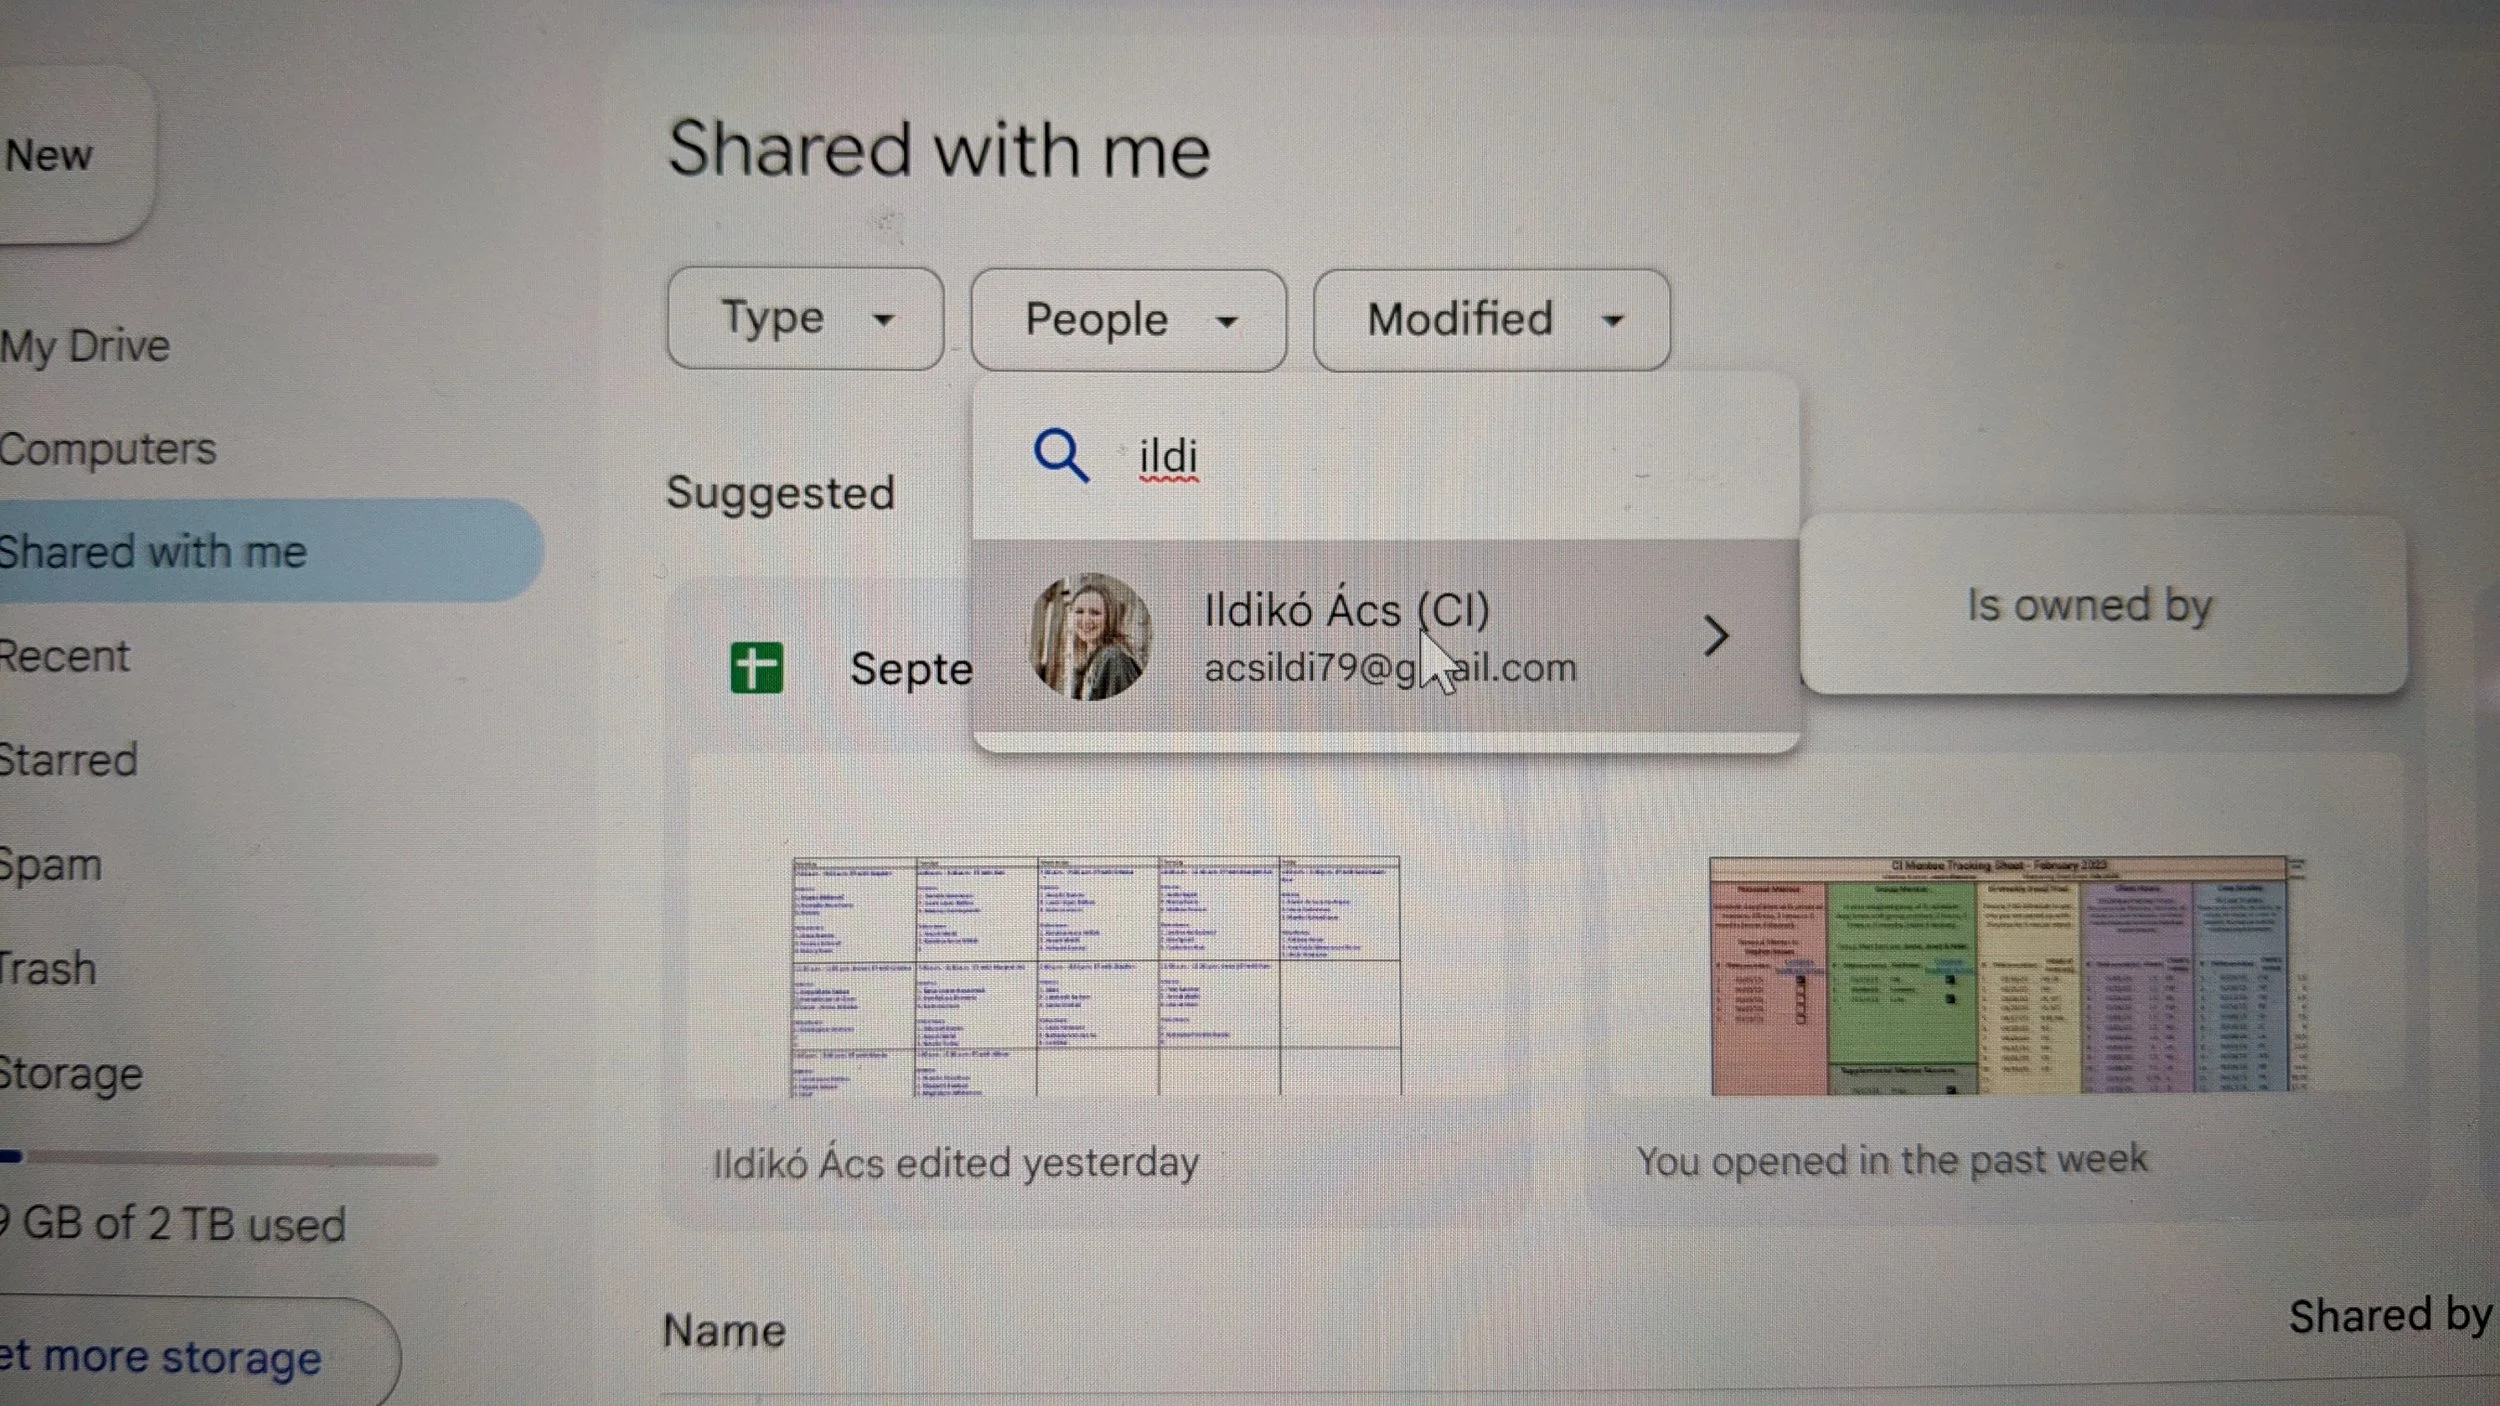
Under the heading "Shared with me", click on
"People"
Search, and start to type in "ildi" and you will be able to select Ildi’s name/email as seen here.
Don’t click on “Is owned by”, just click on Ildi’s name / email as you see highlighted here, as Ildi has also shared documents “owned” by Michelle and others.

Once you do, you will see a list of everything Ildi has shared with you, without having to search through your email for anything.
NOTE: If you don’t get any results from Ildi, then you are not logged into the same Google/Gmail account that you are using for CI, so you’ll need to first log in from that account to do all of this.
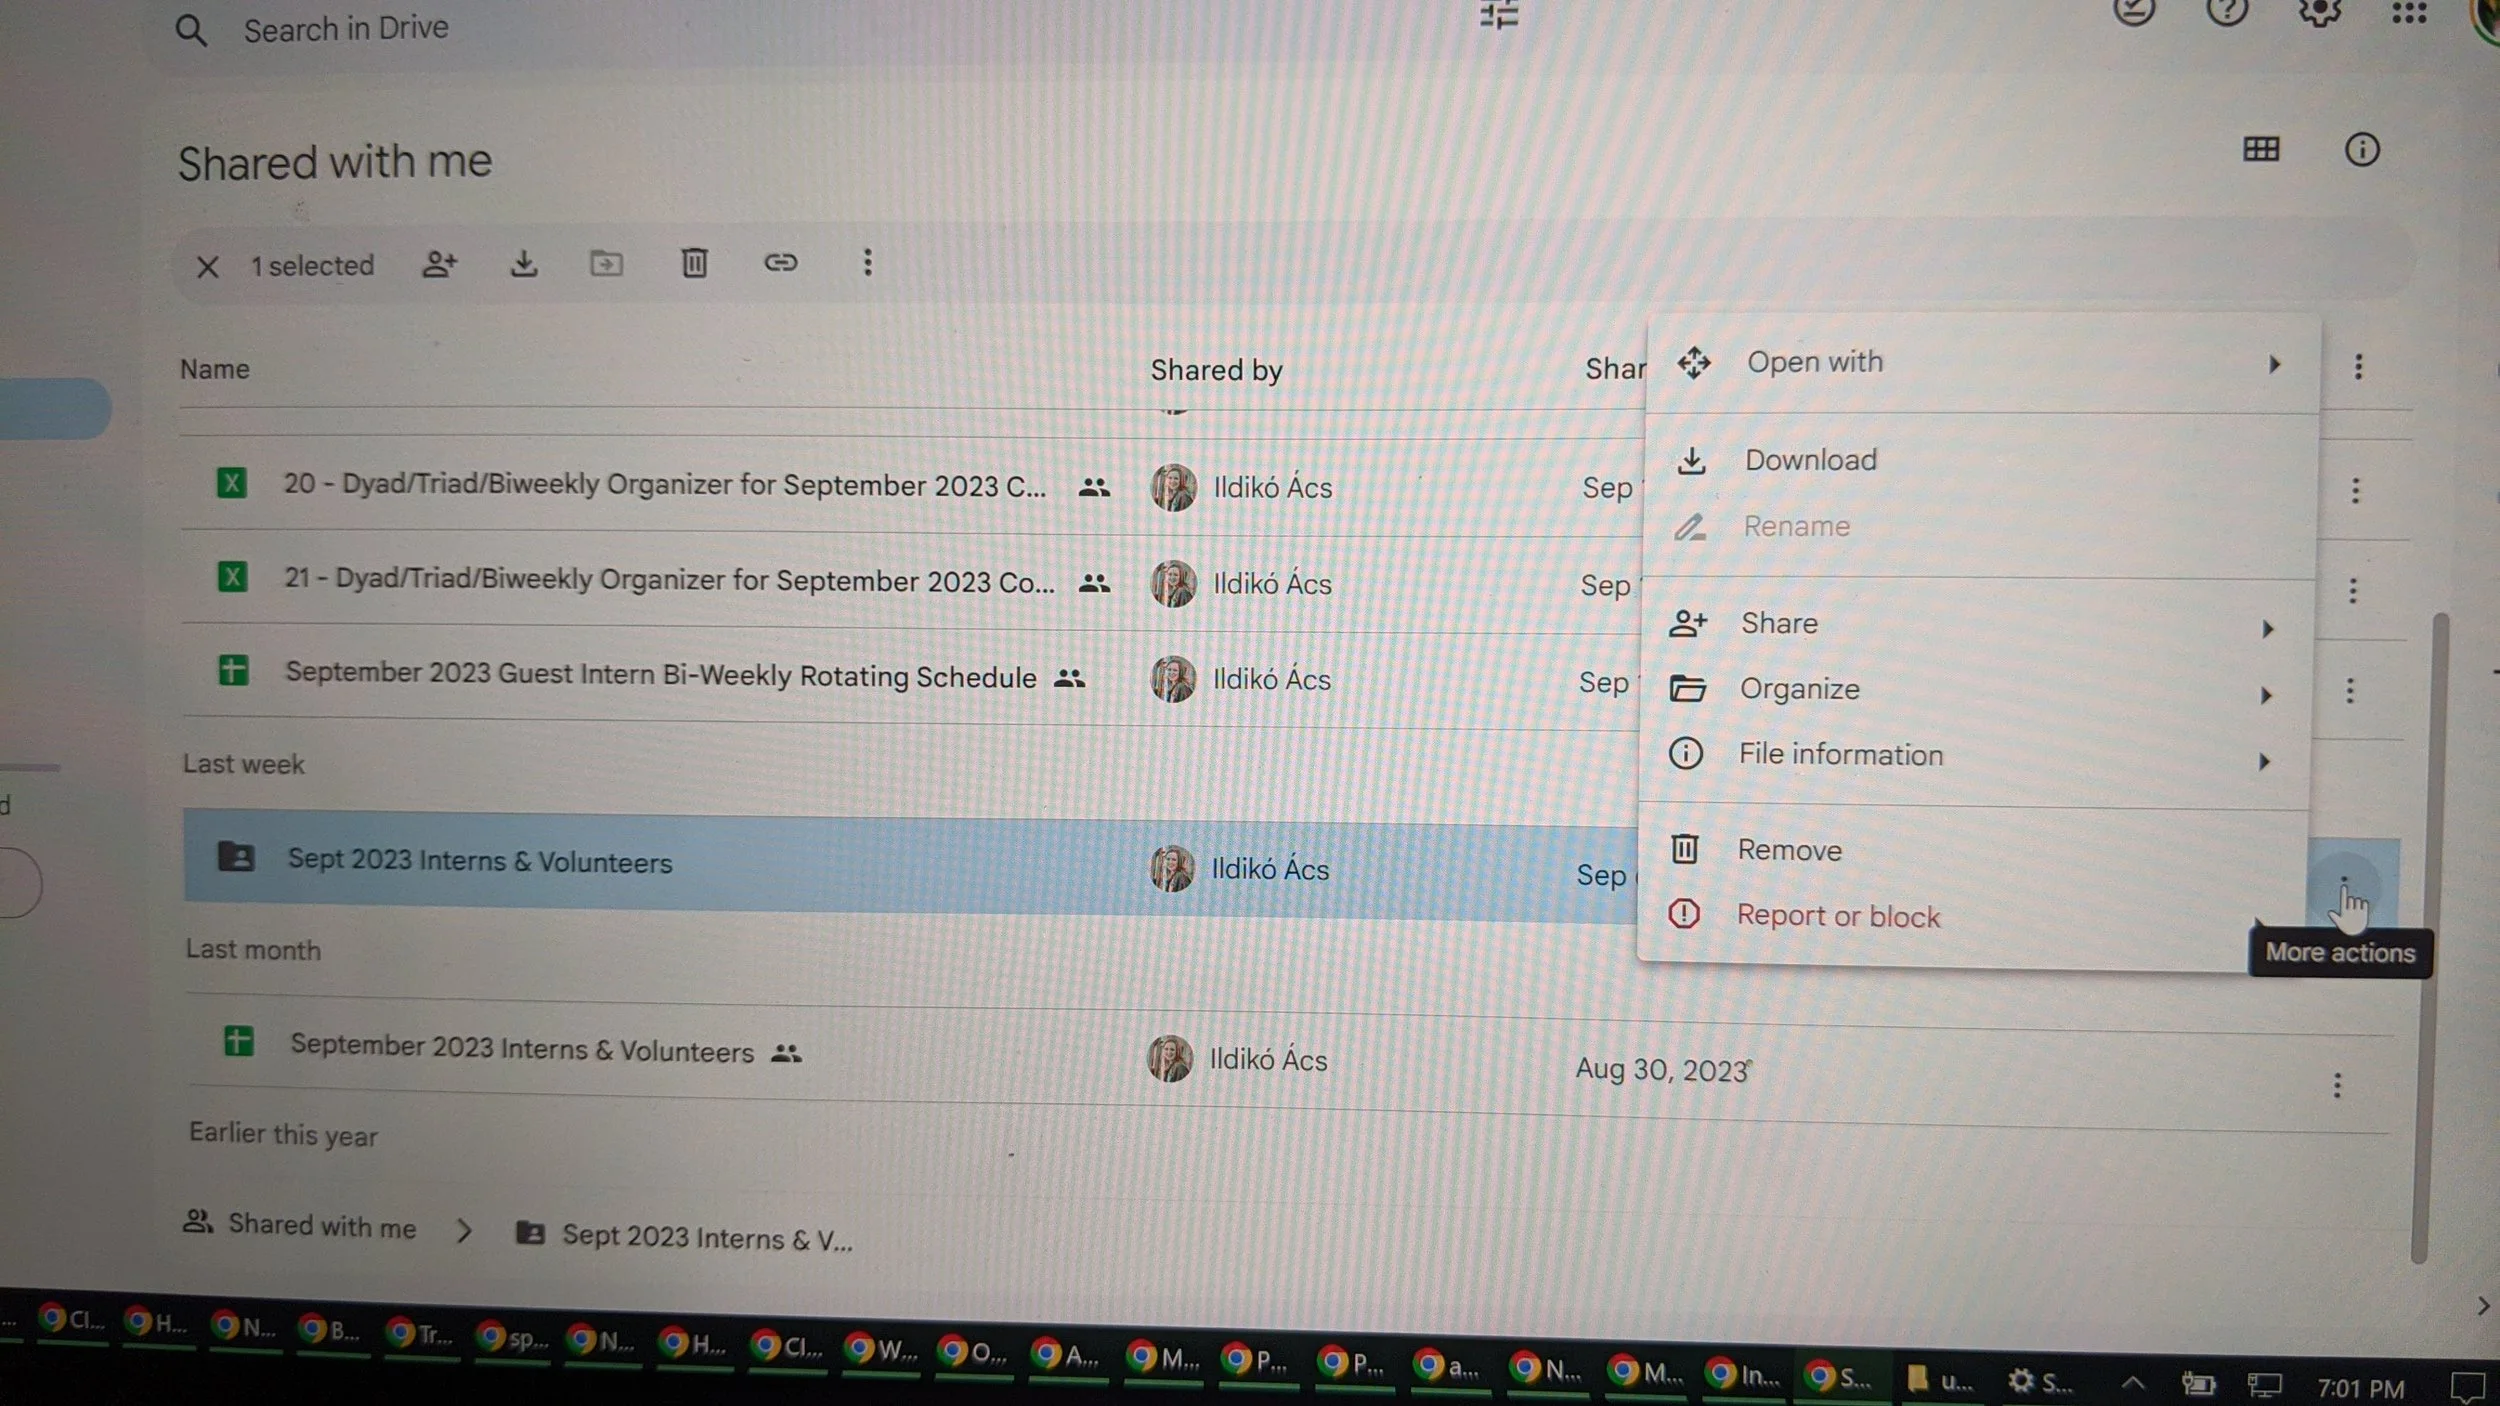
Even though you may recall receiving two separate emails saying Ildi had shared a folder with you and they had different names (“Sept 2023 Interns” and “Sept 2023 Interns & Volunteers”) it is just that the folder was renamed and shared a second time. So you’re only looking for this one folder, currently called “Sept 2023 Interns & Volunteers”.
Click on the three dots to the right, or right-click, to pull up the context menu.

From the context menu, select “Organize”.
Then select “Add shortcut”.

On the next screen, you can select "My Drive" to add the shortcut to the root folder menu on your Drive, if that’s where you’d like it to live.
You can also choose, from the bottom, "Select a location to show the folder path" to navigate the file structure inside your Drive and put it inside another folder.
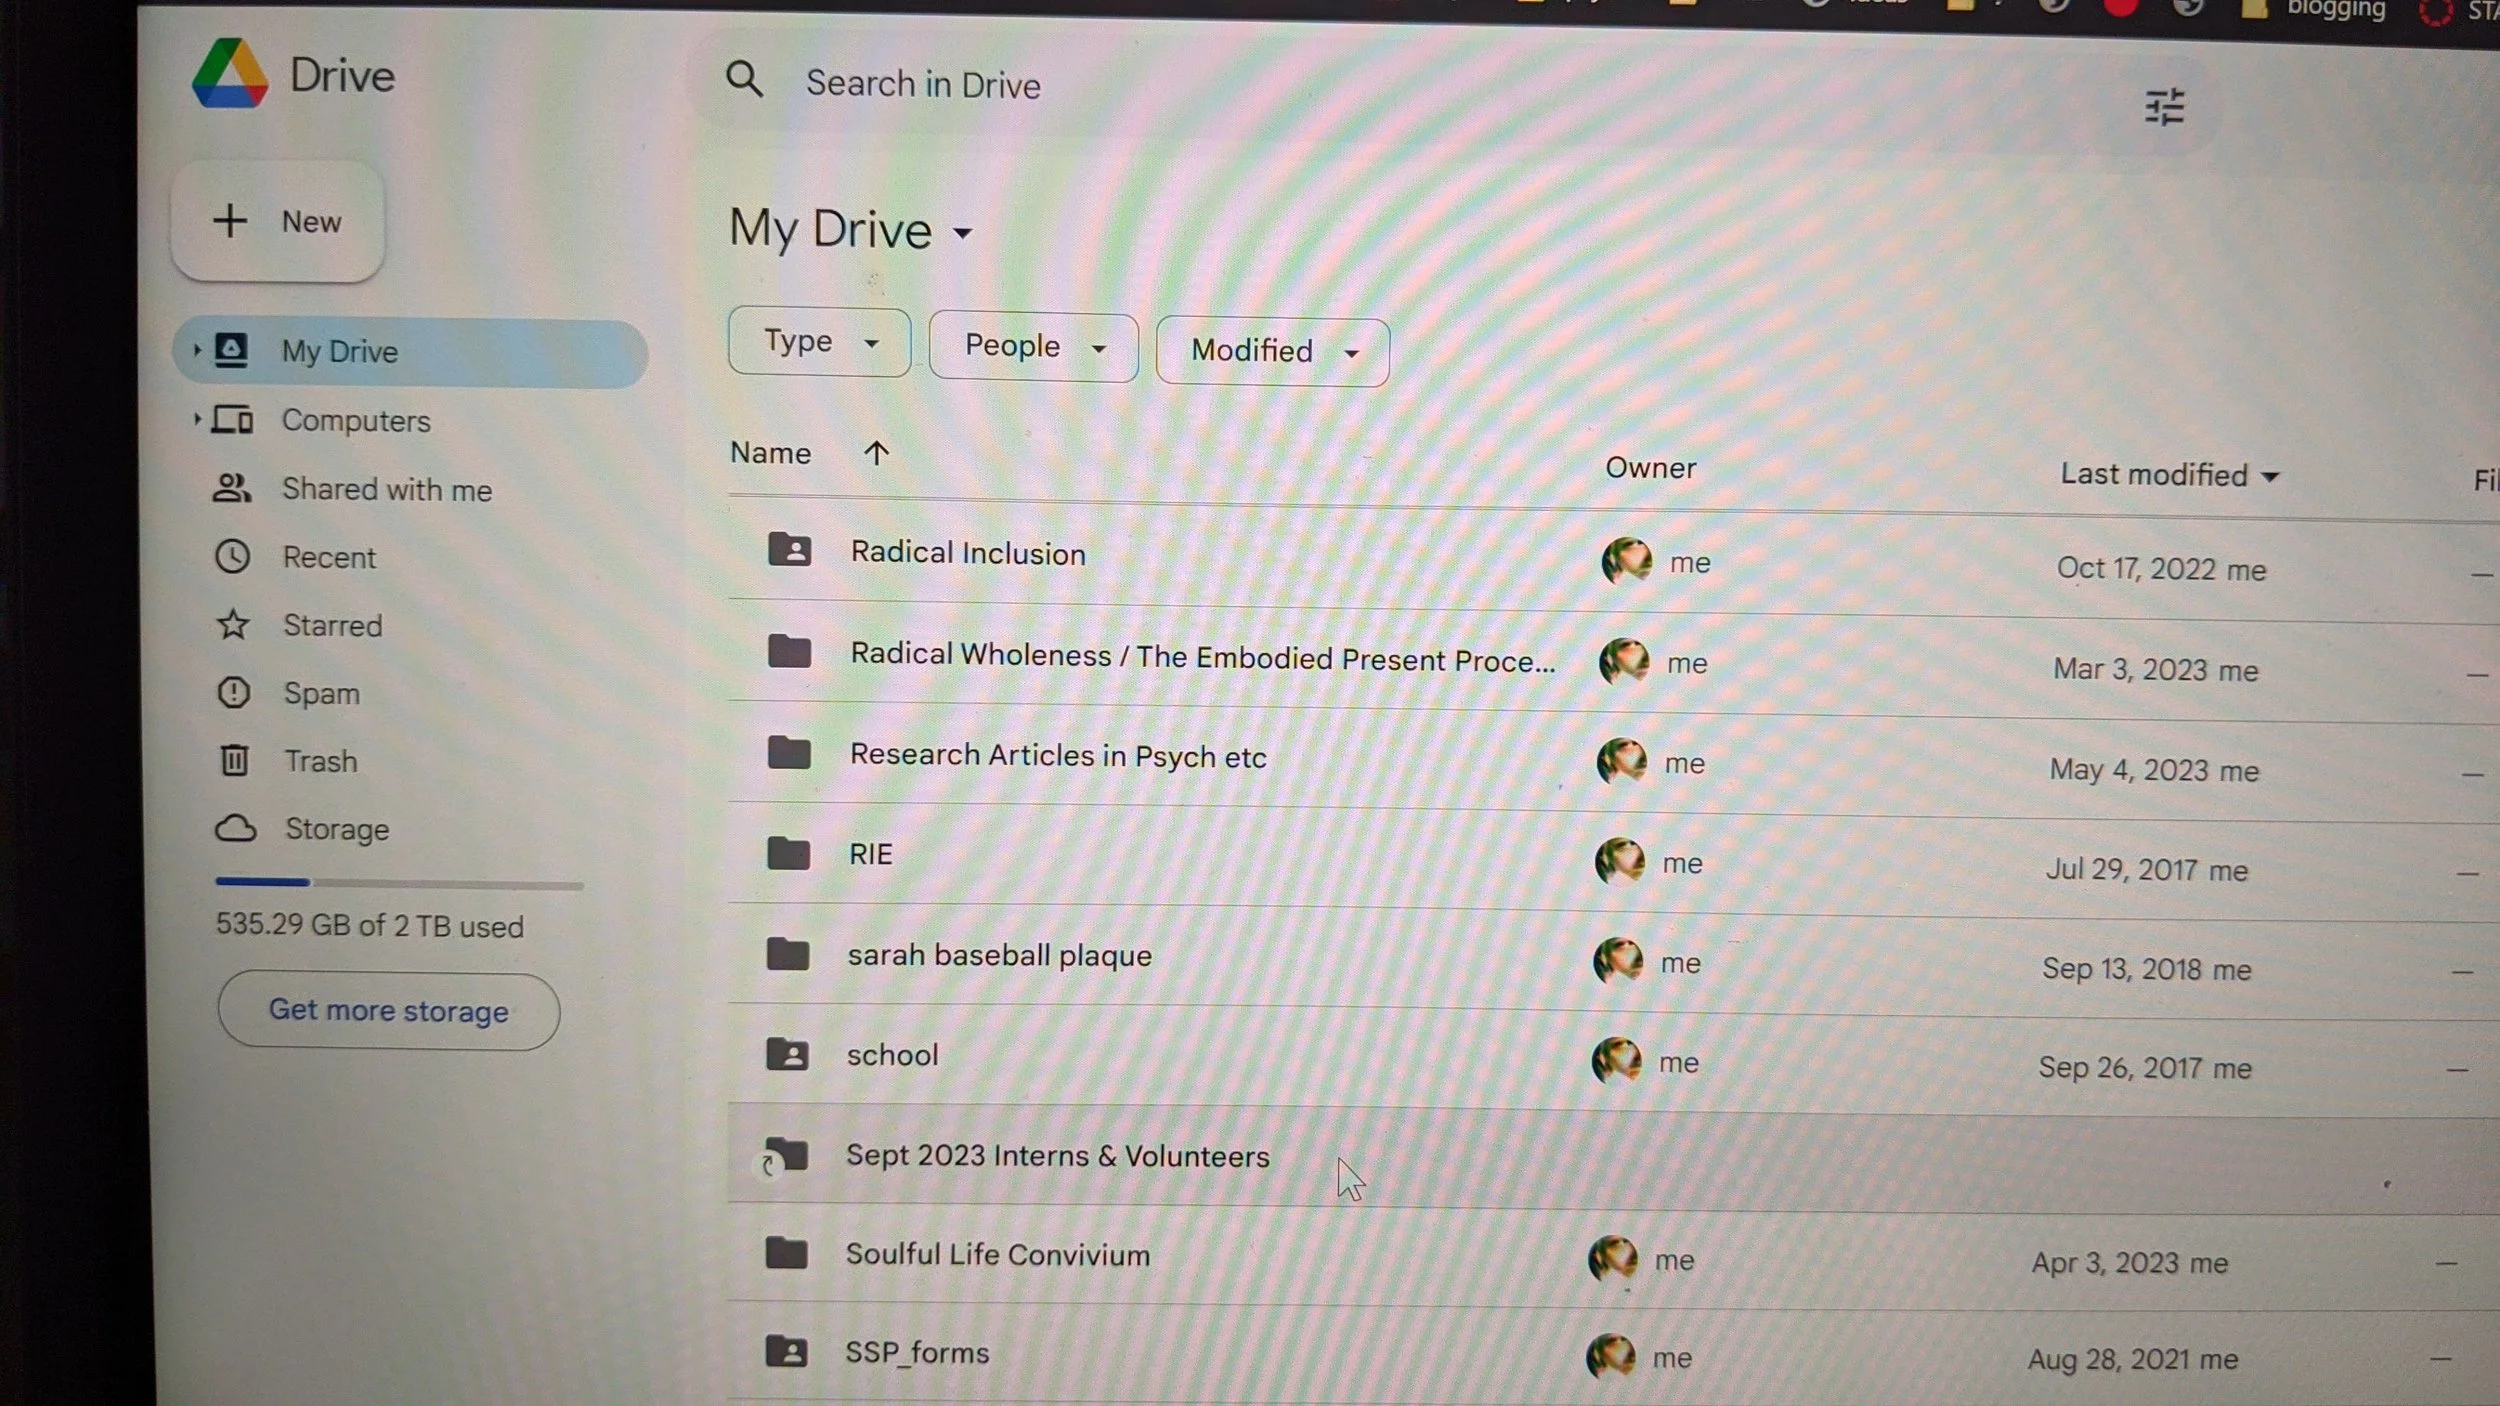
So then if you click on "My Drive" on the left column, you’ll be able to see the folder there.
But…
let’s say you’ve got it in the root directory of your Drive, and decide you don’t want it there because you don’t want to scroll down to 'S', or you put it there earlier and now want to put it inside a folder with your personal documents related to the internship…

In my case, for instance, I have a "Compassionate Inquiry" folder in my root Drive directory where I already store all my CI-related stuff, so I created an "Internship" folder there where I’d like to access all things related to the internship, rather than trying to remember that the internship stuff is in a folder name that starts with 'S'. You can create whatever file structure suits you and move the folder there…

If you’re not already, go back to "My Drive", scroll down to 'S', and click on the three dots to the right, or right-click on the "Sept 2023 Interns & Volunteers" folder.
Select "Organize", then select "Move".

On the next screen, it will prompt you to select the location to move it. The list shown here is "Suggested" folders from my frequent/recently used folders, so yours will be different.
If you want to move it to a folder that’s a subfolder of one that’s listed, click on that > symbol to the right like you see here. In this case, my "Internship" folder is a subfolder of my "Compassionate Inquiry" folder, so I can show you what that looks like.
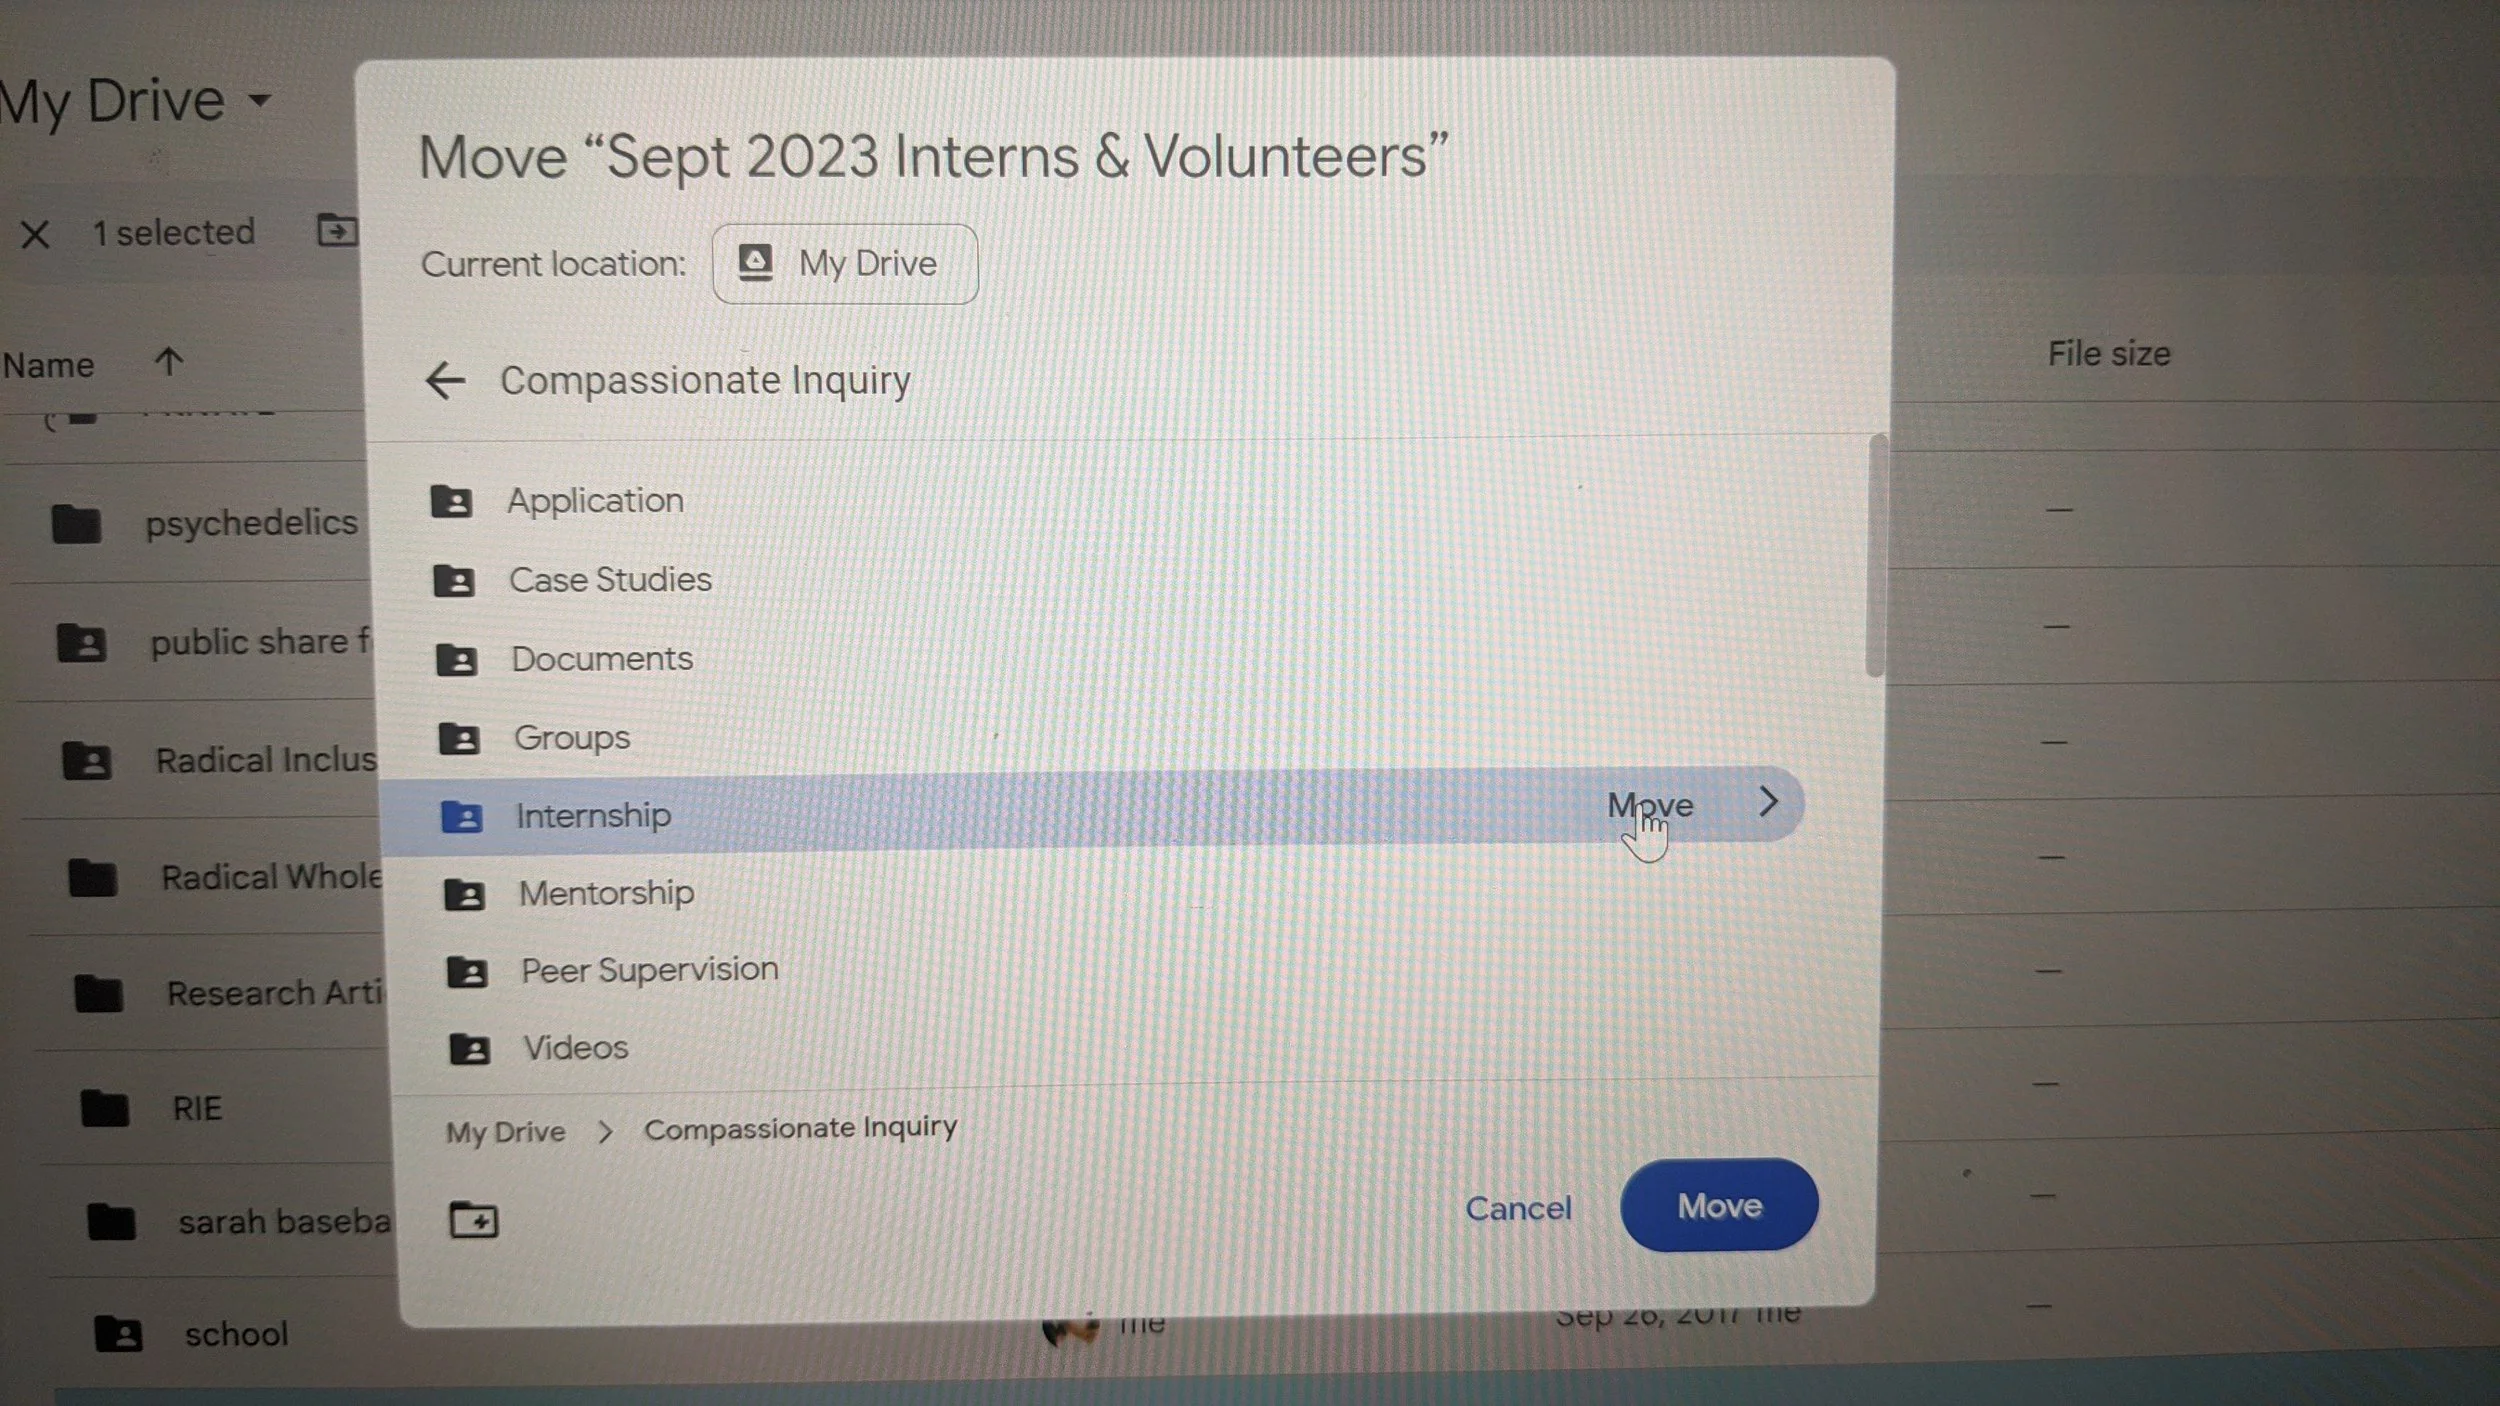
Then you’ll see the subfolders inside of that folder you just clicked on, like this.
(Note, I didn’t have to do it that way from the previous screen, because it had listed the "Internship" folder in that list directly, but I chose to do this extra step just to show what this process looks like in case the folder you want to choose isn’t listed.)
When you find the folder you’re looking for, click on "Move" and it will move the shortcut to Ildi’s folder to this folder of your choice.

You will most likely be presented with this mildly alarming verification / warning prompt.
It is nothing to worry about, you can select "Move". It does not modify or otherwise affect anything that belongs to Ildi or anyone else.
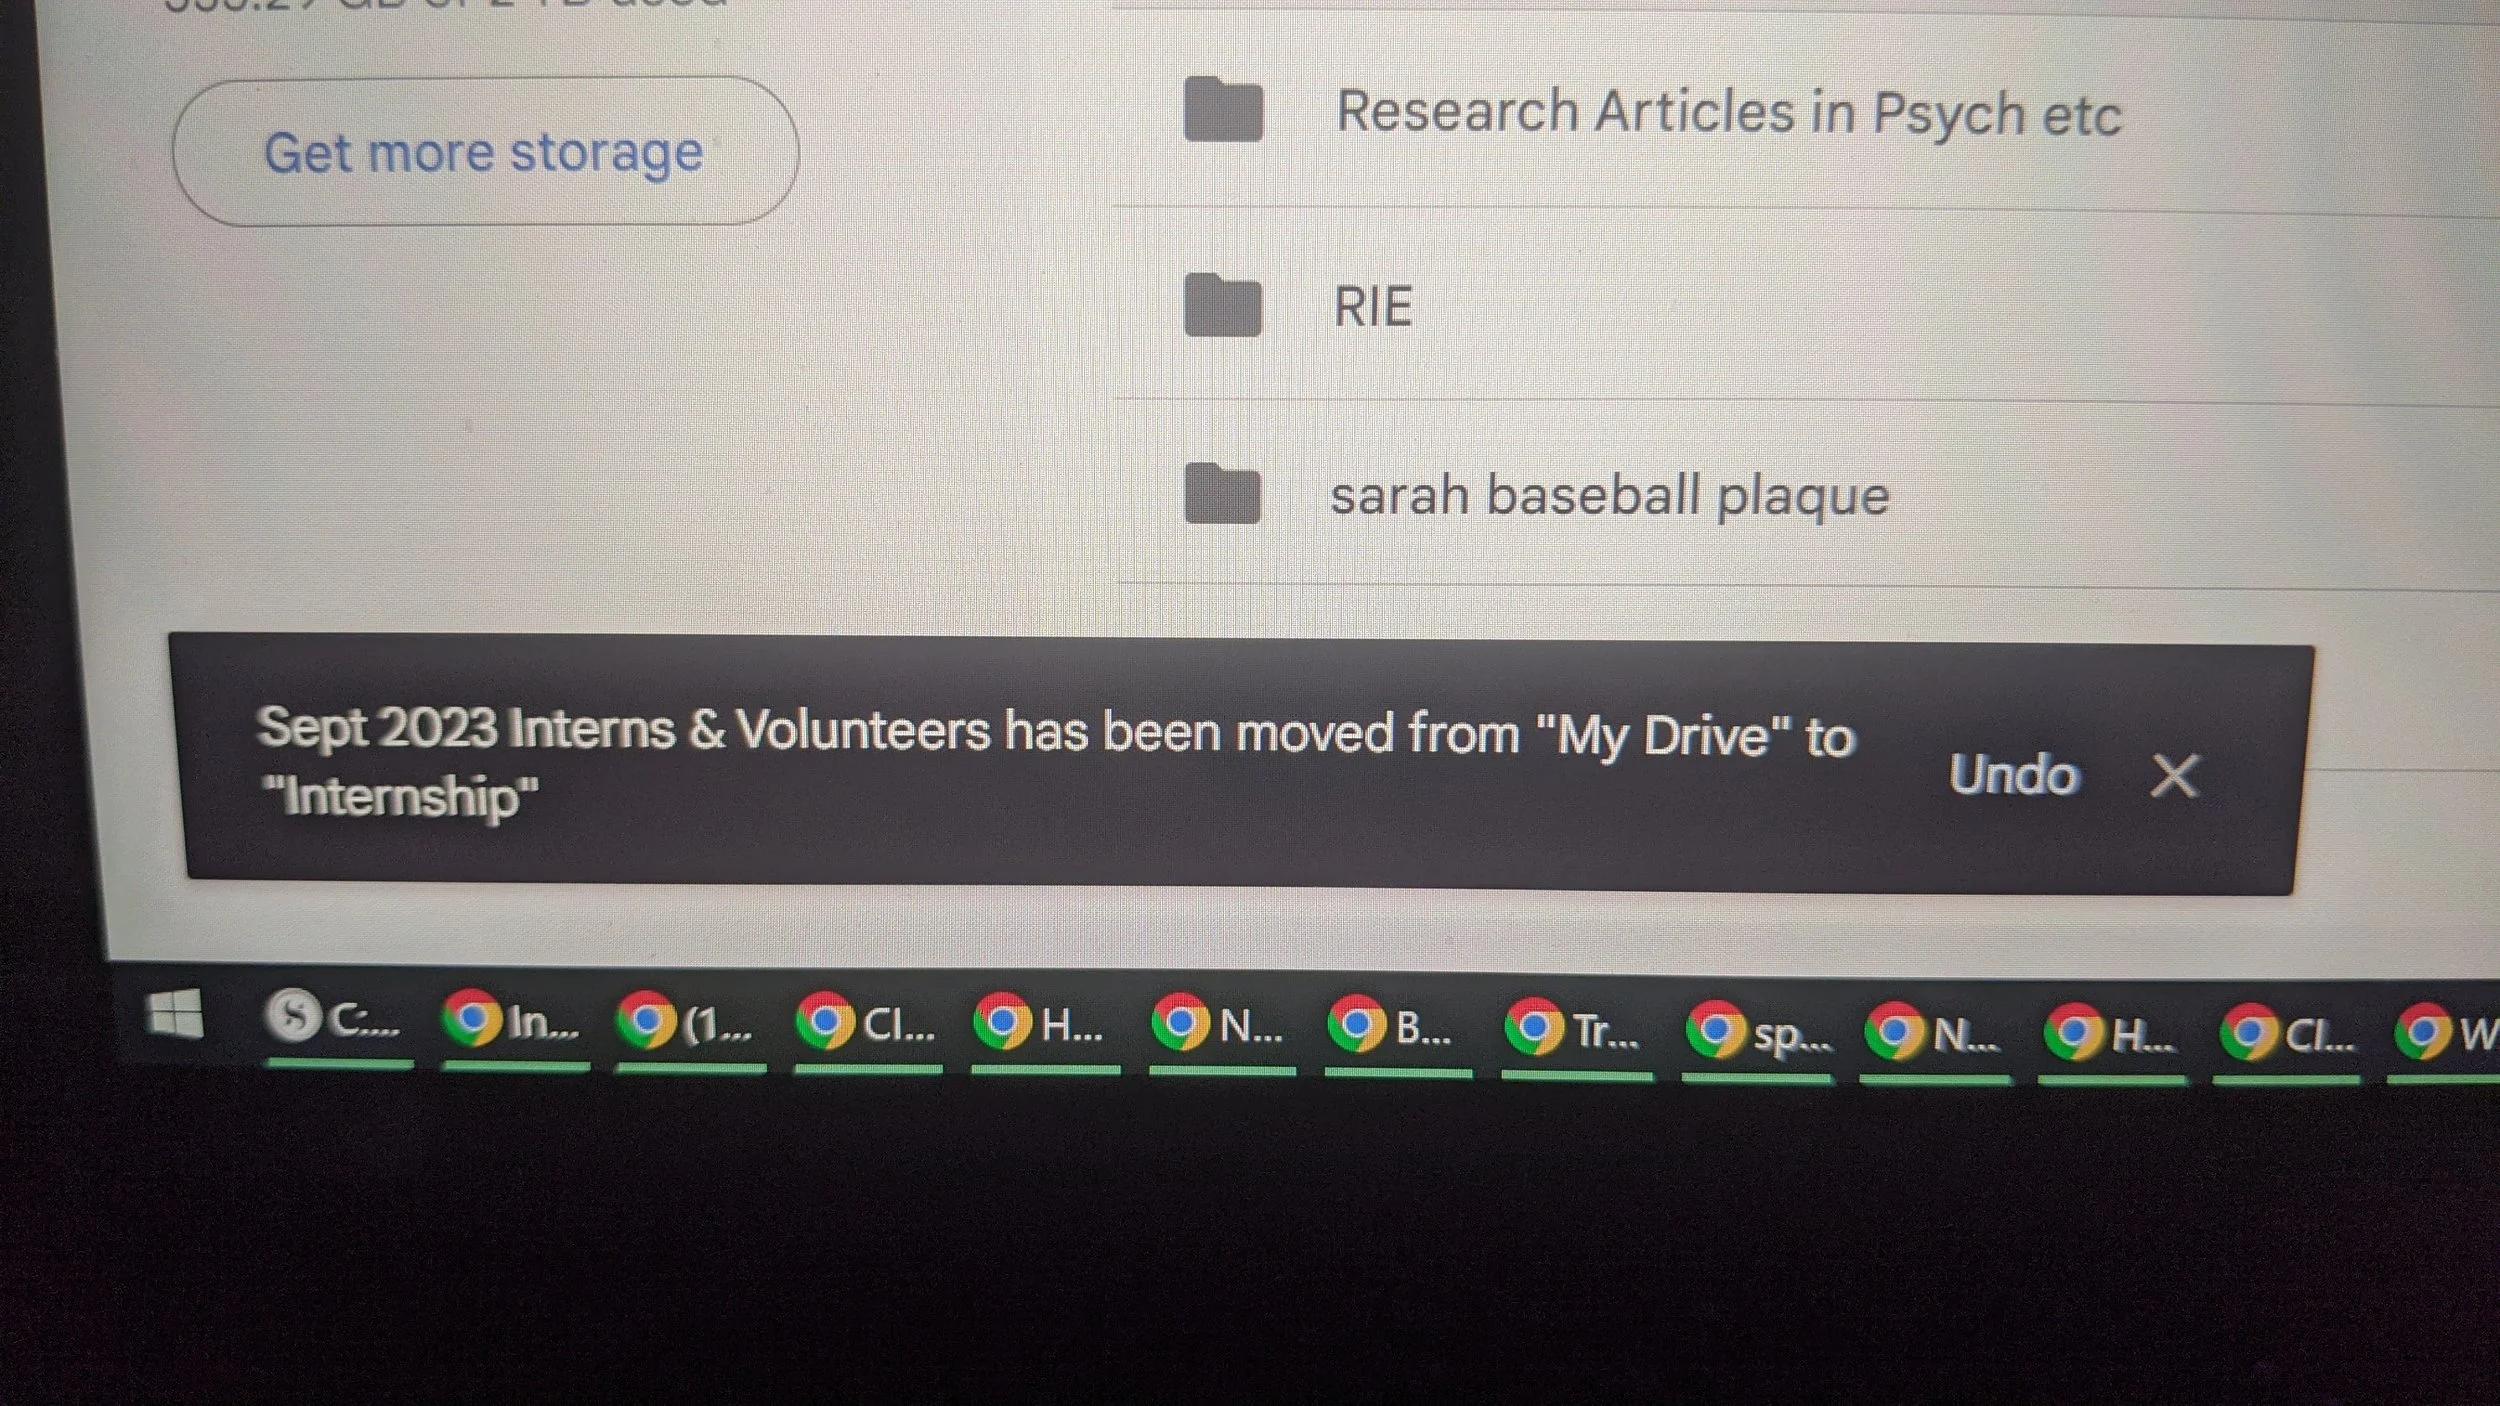
For a brief moment, maybe 3 seconds or so, you will see a confirmation message pop up at the bottom of the screen like this.
If all is well, ignore it until it goes off screen.
If you realize you accidentally chose the wrong folder, you can click "Undo" and try again.

If you navigate to your folder, you will see the shortcut listed there now and can always access it from there.
NOTE: this is a shortcut to Ildi’s folder, with all the original files. It is not a copy of the folder or its contents. For any file you need a copy of, because you need to modify it for your biweekly group, you’ll need to make a copy and move it here. There are two ways…
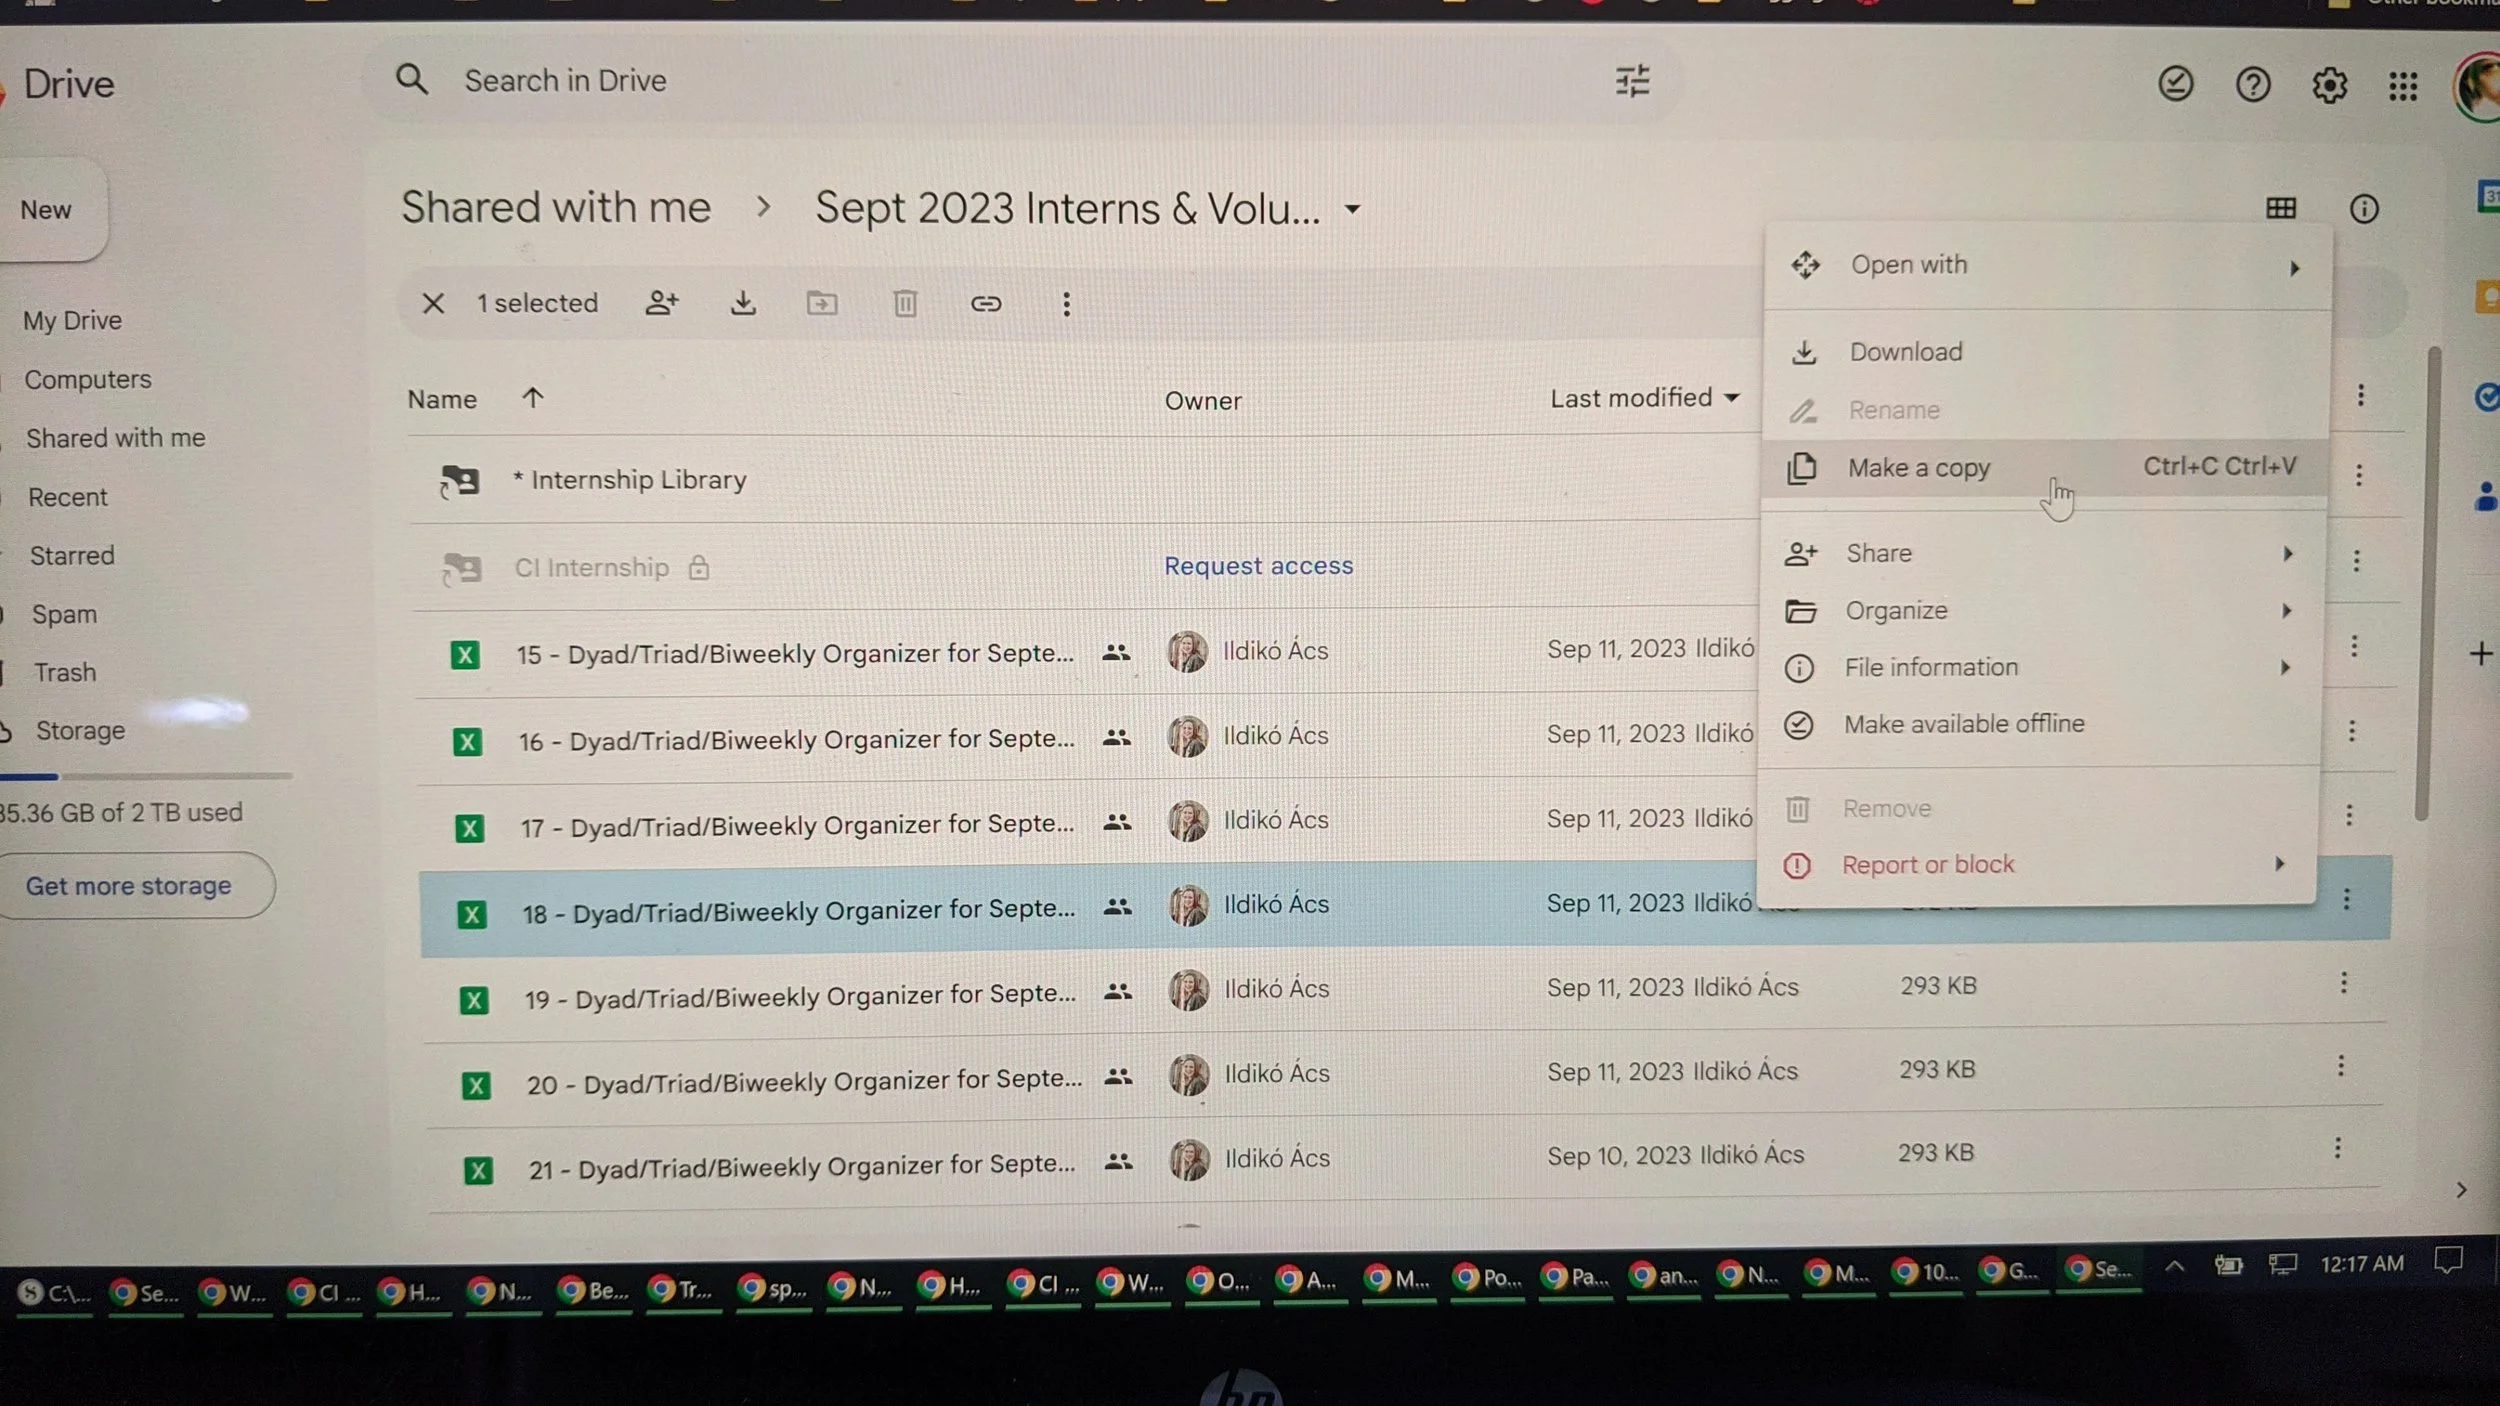
The first way is to click on the three dots at the end of the line (or right-click) for the file you want to copy, and select "Make a copy". This way is less ideal, but I will show you how it works so you know both of your options and how they work, because maybe you’d like to know the ins and outs of Google Drive better.

It should, by default, put the file copy into your root directory of your Google Drive. There are instances when it may not (though this is not one of those instances). In general, the quickest way to go grab that file, so you can now move it to the place you actually want it to be, is to click on "Show file location" on this dialogue box that will pop up for just a few seconds. When you click there, it will automatically navigate to the location of the file and highlight that file for you.

If you did it that way, you’d be taken to your root folder with all kinds of files you probably haven’t seen in years and that you forgot existed!
If you click on the three dots or right click on that file, you will select "Organize", then "Move".

This screen should look pretty familiar because it’s basically the same as the one you used when you added the shortcut to Ildi’s folder earlier.
If you see your folder (like here, for me, the "Internship" folder) and want to be sure it’s the correct folder, select the line and look at the bottom. It shows the file hierarchy. In this case, My Drive > Compassionate Inquiry > Internship (because that’s how I have my folders set up).

This may generate yet another mildly alarming warning / verification message. Again, nothing to worry about; you can go ahead and click "Move".
These last few steps are the slow / cumbersome way to do it, though. I will show you a better & quicker way to make file copies in Google Drive.
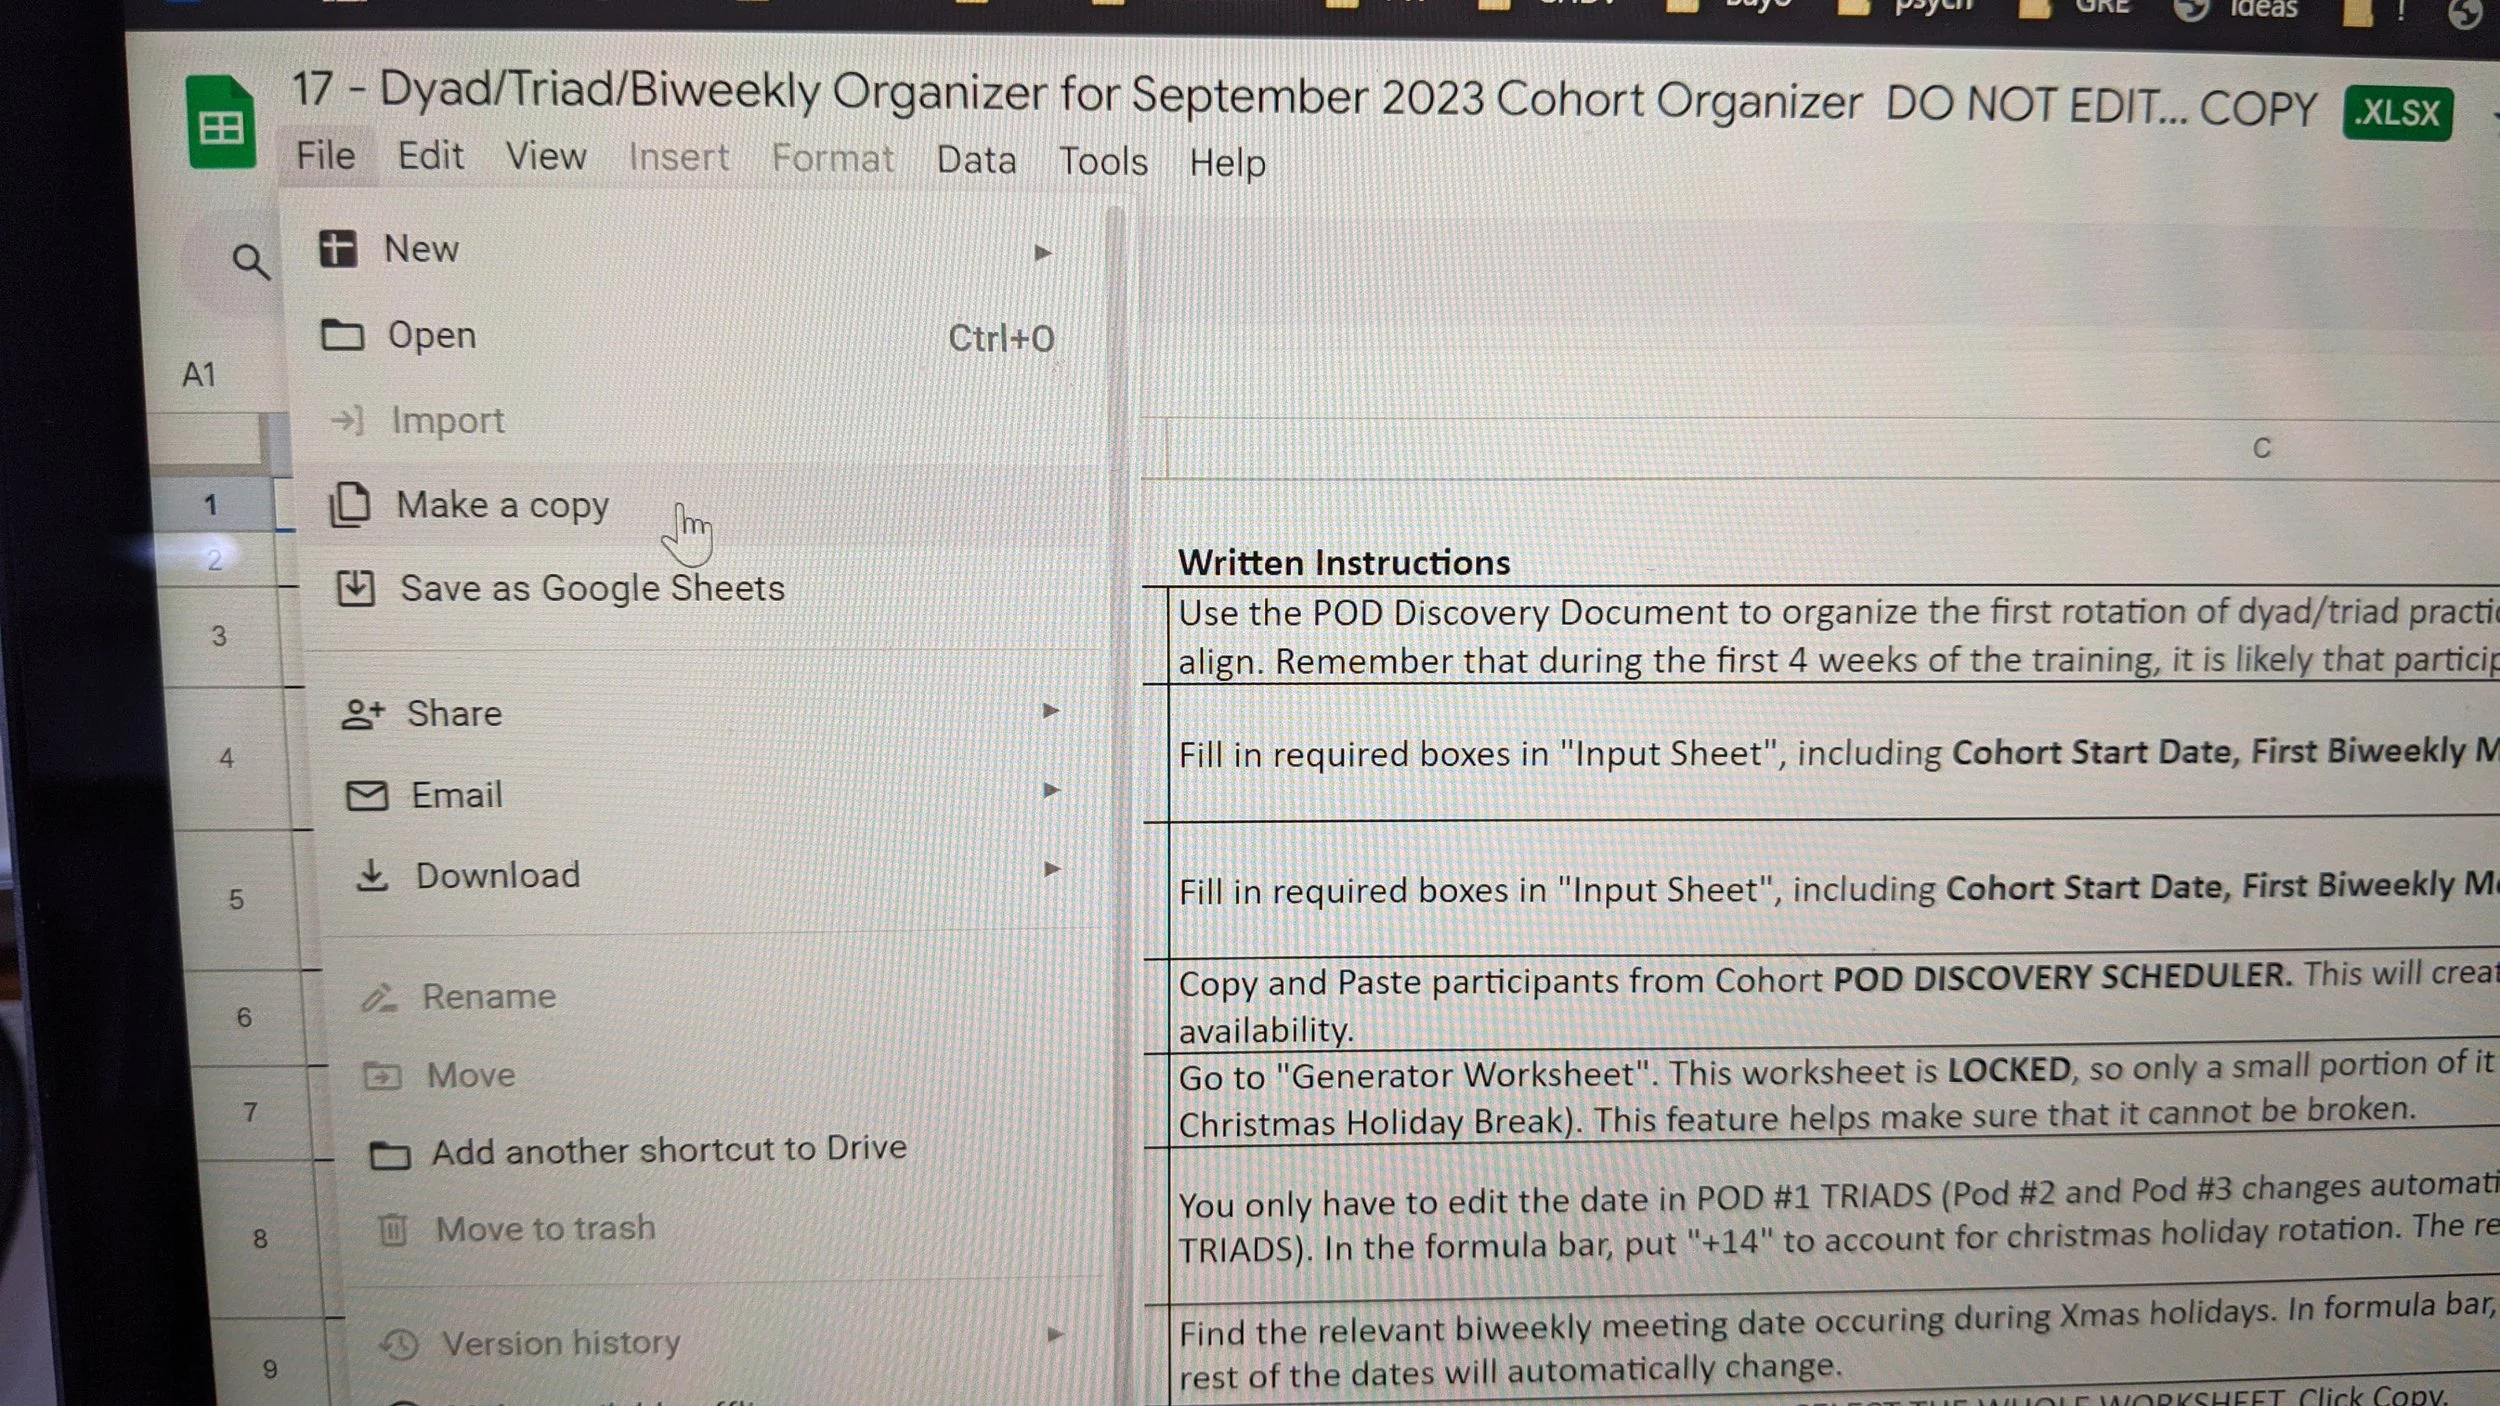
The thing to do is OPEN the file you want to copy. I don’t know why it works so differently this way, but it’s way better.
Go to "File" and select "Make a copy". The next step is not the same!
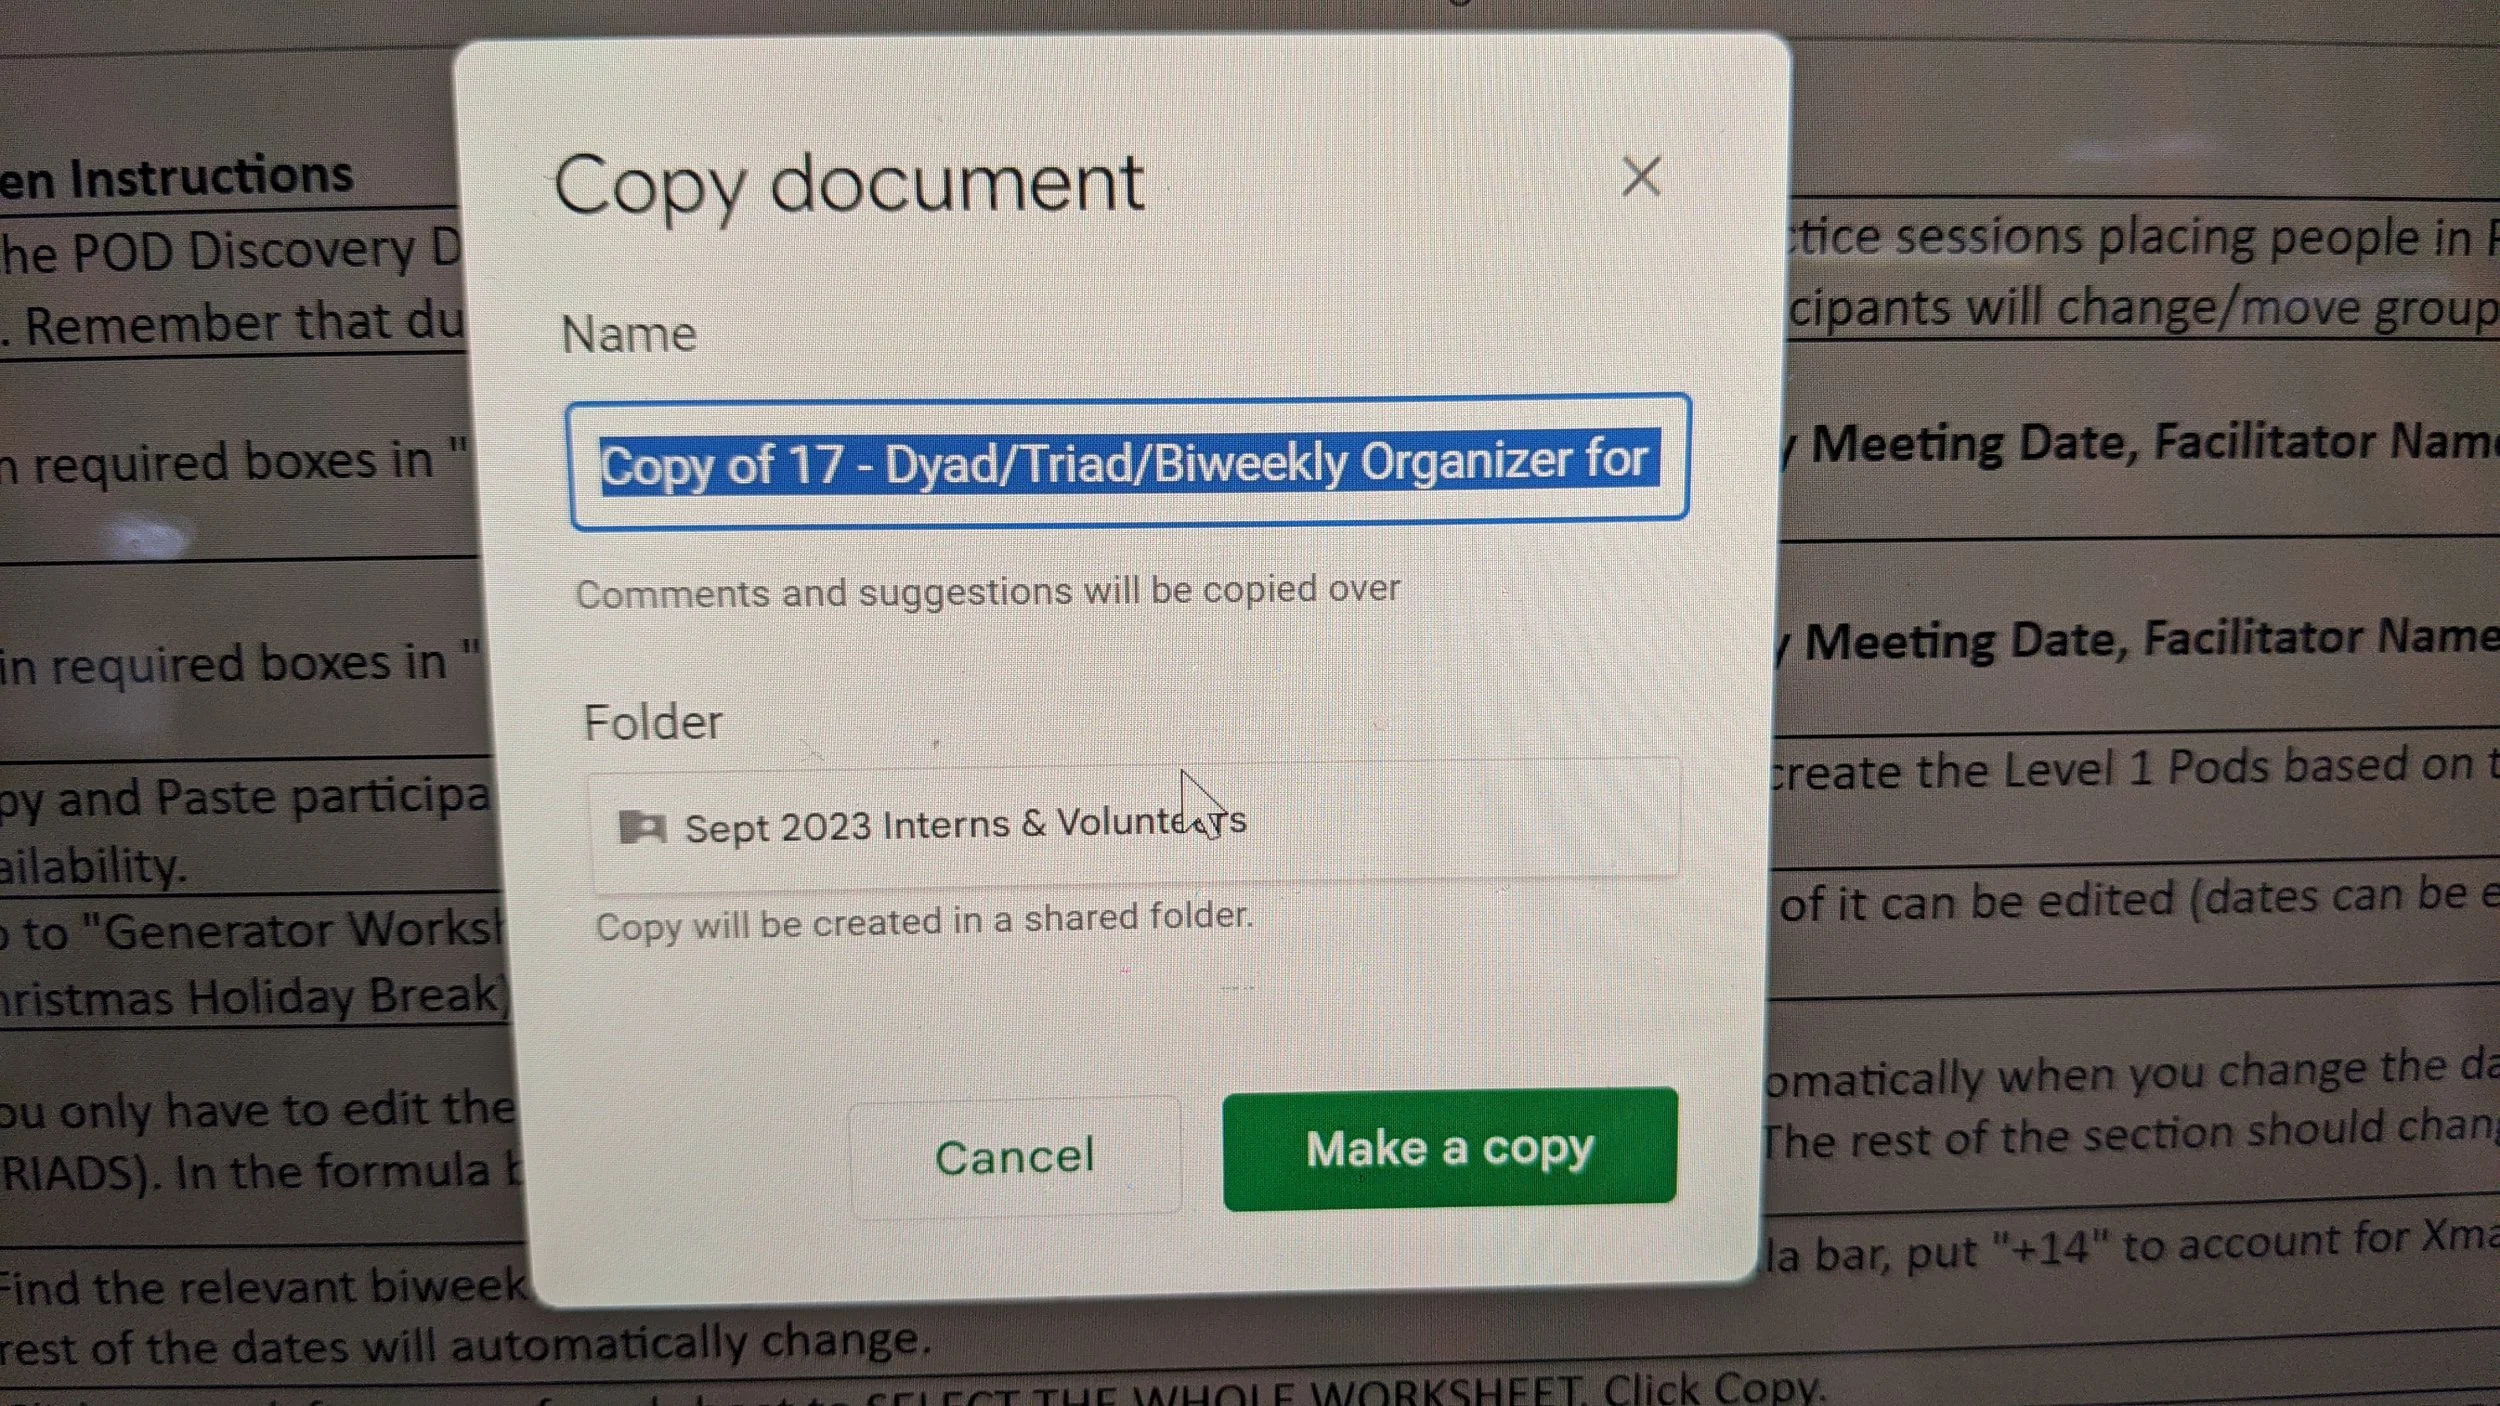
The beauty of the next screen is that in one place you can rename the file (who wants "Copy of…" at the beginning of every file name?) and you can choose the folder you want it in. In one step. On one screen. And you’re done. It’s so easy.
(Google, WHHYYY??? It should be like this when you do it the other way, it really should!)

So as you see here, I’ve renamed the file to get rid of "Copy of" at the beginning of the file name, but if I wanted to, I could name it anything that I wanted to, that would help me spot or find the file easily. And I’ve selected my folder that I want it in, which is the "Internship" folder I created for myself. You click the "Make a copy" button and you’re done. Now you have your own copy of this file, and you can edit it without accidentally overwriting the original!
That’s just about everything you need to know to get yourself organized. You can use these same steps for everything. Also know, if you “lose” a file but know its name, you can search for it. From the search results, you can click the three dots (or right-click) and choose "Organize" > "Move" same as you did before, to get that “lost” file into the folder you want it in.